For the past year, I’ve done almost all my design work in DrawBot — an incredible program that makes designing-in-code easy and good, not only because it leverages and implements a high-quality programming interface for typographic work, but also because it changed the way I think about graphic design.
For instance, you know that sinking feeling when you finally make the call to “Create Outlines” in an Illustrator document or “Create Shapes from Text” in After Effects? And then an hour later you realize you need to change the original text and so redo a dozen destructive editing steps sourced from menus all over the interface? That doesn’t happen when designing-in-code, because you write those steps down and have the computer do everything for you. Why do I love DrawBot? Because it doesn’t burn bridges to content, and doesn’t compromise on typography. Words remain words (not shapes), right up to the deadline.
That’s why I particularly enjoy writing animations in DrawBot. When you add the dimension of time to typesetting, things can quickly spiral out of control.
Why animate in DrawBot?
For a long time before learning After Effects, I wanted to learn how to make kinetic typography animations — like one of those videos where the words pop onto the screen as they’re being narrated. But when I did finally learn how to build an animation like that in After Effects, I was horrified to find out how manual the process is. Frame-by-frame, you search for the start of a sound in an inscrutable waveform and then try to align a word to it, then you realize you can’t change the formatting of multiple keyframed pieces of text in After Effects without going keyframe-by-keyframe or writing a script in an arcane dialect of JavaScript. Simply terrifying.
Then I realized I could write typographic animations in DrawBot — animations like this one. But as I started writing more and more of these animations in code, I found that there were a few downsides to the workflow:1
- When the animations got long or complicated, they tended to get very slow;
- when they involved audio, it was always difficult to preview the animations while also hearing the audio;
- and when they involved variable fonts, I’d sometimes see some contour artifacting in the final result.
I also ended up copying and pasting the same code over and over again from project to project, which is usually a sure sign that there might be a need for a programming library. That’s why I put together furniture, a Python module that abstracts some animation techniques and programming patterns into a small library. (More on that below.)
Now when I write typographic animations — like this one or this one — I write them with furniture.
Writing an animation with DrawBot and furniture — a tutorial
Below is a short tutorial on how to use the furniture module to make the above animation with DrawBot. I’ll admit upfront this tutorial assumes some knowledge of working on the command line in Terminal.app (or wherever), but I’d put it at an intermediate for general programming knowledge. If you’re new to programming, I highly recommend the excellent (& new) resource, Python for Designers.
Things you’ll need for this tutorial
There are detailed instructions for installing these in the steps below, but here’s an overview of the the main components you’ll need:
1. A module installation of DrawBot
You can also think of this as a “headless” installation of DrawBot, since it does not involve the user interface at all. The reason to install this is simple: it lets you run animations from the command-line. A caveat! There is a big cliff to climb before you can install DrawBot as a module, namely that you need to have a working installation of a Python whose version begins with 3.6. (I think you can use a Python >= 3.7 but that can cause some headaches.) I’ve had the most success when installing Python 3.6.7 from the 64-installer for Mac available here.
2. A small python library I wrote called furniture
Originally I wrote this library to contain a bunch of geometry functions for slicing & dicing rectangles (functions that that I grew to love back when I was programming iOS applications), but after deciding on a general pattern for building animations in DrawBot, I added a class called Animation, available in the furniture.animation package. The point of this class is to consolidate animation code and eliminate as much boilerplate as possible. It’s built around the concept of a “callback,” which I came to understand in the context of audio programming, but is a common pattern in visual programming as well. Essentially, the idea is to define a bit of code in a function, then register that bit of code with a system that knows when and how to call it into action. (More on this below.)
3. After Effects
Well, either After Effects or Premiere. (Or probably any professional video editing software that allows you to manually clear its frame cache.) Though originally I was using the command-line version of ffmpeg to avoid the Creative Cloud altogether, I came to realize that (A) I don’t know of any great non-Adobe ways of previewing animation frames perfectly in sync with audio, and (B) when you’re combining DrawBot animations with other media (like footage you’re editing in Premiere), it’s easier to have that animation pipe directly into a professional video editing application.2
Coding an animation
N.B. All the code referenced below can be found in this repository: github.com/stenson/furniture-animating.
Step 0. Installing the module version of DrawBot
(If you already have a module installation of DrawBot, skip to Step 1).
There are instructions here in the DrawBot github repo, but here’s a slightly modified version that has worked on my machine.3
(N.B. I keep all kinds of typography-related github repos in a folder called ~/Type/typeworld on my computer, so that’d be a good place to clone the drawBot repo into if you’re so inclined.)
> git clone https://github.com/typemytype/drawbot
> cd drawbot
> pip3 install PyObjC
> pip3 install fontTools
> python3 setup.py install
Step 1. Installing furniture
You can install furniture on the command line like so:
pip3 install furniture
This will make the furniture.animation module available to your installation of DrawBot.
You can verify that you’ve got everything working at this point by opening up an interactive python3 shell and trying to import drawBot and furniture, like so:
> python3
>>> import drawBot
>>> import furniture
No errors? Then you’re good to go!
Step 2. Setting up an animation
Now you should open up DrawBot, and try out this code:
from furniture.animation import Animation
from drawBot import *

def draw(frame):
    fill(frame.doneness, 0, 0.5)
    # frame.doneness is a 0-1 value that we pass directly
    # to the "red" channel of this rgb function, so the
    # color will move from having no red to having full red
    rect(*frame.page)

animation = Animation(draw, length=60, fps=30, dimensions=(1000, 1000), burn=True)
animation.storyboard(frames=(0, 30, 59))

You should save this as a file called part1.py in an empty folder called furnituretest, which you can place wherever you’d like. And while you’re there, make sure to create a folder in that empty folder called frames.4
So you’re folder structure should look like this:
furnituretest/
    part1.py
    frames/
Now you can feel free to hit Cmd+r to run the code inside DrawBot.
Blocks of color! Very exciting. (If you get an error about the furniture library, try restarting DrawBot.)
A little about the code: you’re creating an Animation object that knows how to render your animation with the draw function. So every time you want to render a frame, the draw function is called, with information about that frame. For instance, the frame.doneness is a number between 0 and 1 that tells you how far along the animation you are at any given frame (based on the length that we provide to the Animation constructor, currently set to 60). This 0-1 value might seem pretty useless at first, but is actually very powerful, since it can be used as a seed for easing calculations, and so saves a lot of boilerplate in the long run. In the short run, frame.doneness lets you smoothly transition from blue to pink in the fill color.
You may also have noticed the animation.storyboard call at the bottom of the file. This is actually the reason I wrote the library: the ability to quickly and easily render and view just a handful of frames from an animation, without having to change a bunch of variables in a loop (as seems to be the common practice when generating animations in DrawBot), saves a ton of time.
Now add one very important line of code to the top of the file:
from drawBot import *
This statement is unnecessary when writing and running code in the DrawBot app itself, but makes it possible to now run this code from the command-line.
Which we can now do, like so, once you cd into the furnituretest directory:
> python3 -c 'import part1; part1.animation.render()'
That should print a lot to the terminal, hopefully about which frames are being rendered. Now you can look in the furnituretest/frames directory, and there should be 60 pdfs there, all blocks of color slowly transitioning from blue to pink.
Aside: Why render PDFs?
I used to render PNGs for viewing in Premiere, but but I’ve found that PDFs render faster and avoid any overlap issues in variable fonts.
Step 3. Adding text to the animation
Colors slowly transitioning at 30 frames-per-seconds is cool, but the real power of DrawBot is in its typographical support, so before we get everything set up in After Effects for viewing, let’s try something a little different in our code.
In a new file called part2.py, enter in this code:
from furniture.animation import Animation
from drawBot import *

def draw(frame):
    fill(0)
    rect(*frame.page)

    y = pow(2 * frame.doneness - 1, 2)

    font("MotterPixturaVariable_v0001.ttf")
    fontVariations(wdth=(1-y)*1000, wght=500)
    fontSize(200)
    lineHeight(150)
    fill(y, 0, 1)
    text("Hello\nWorld", frame.page.offset(0, 50).center(), align="center")

animation = Animation(draw, length=60, fps=30, dimensions=(1000, 1000), burn=True)
animation.storyboard(frames=(0, 30, 59))
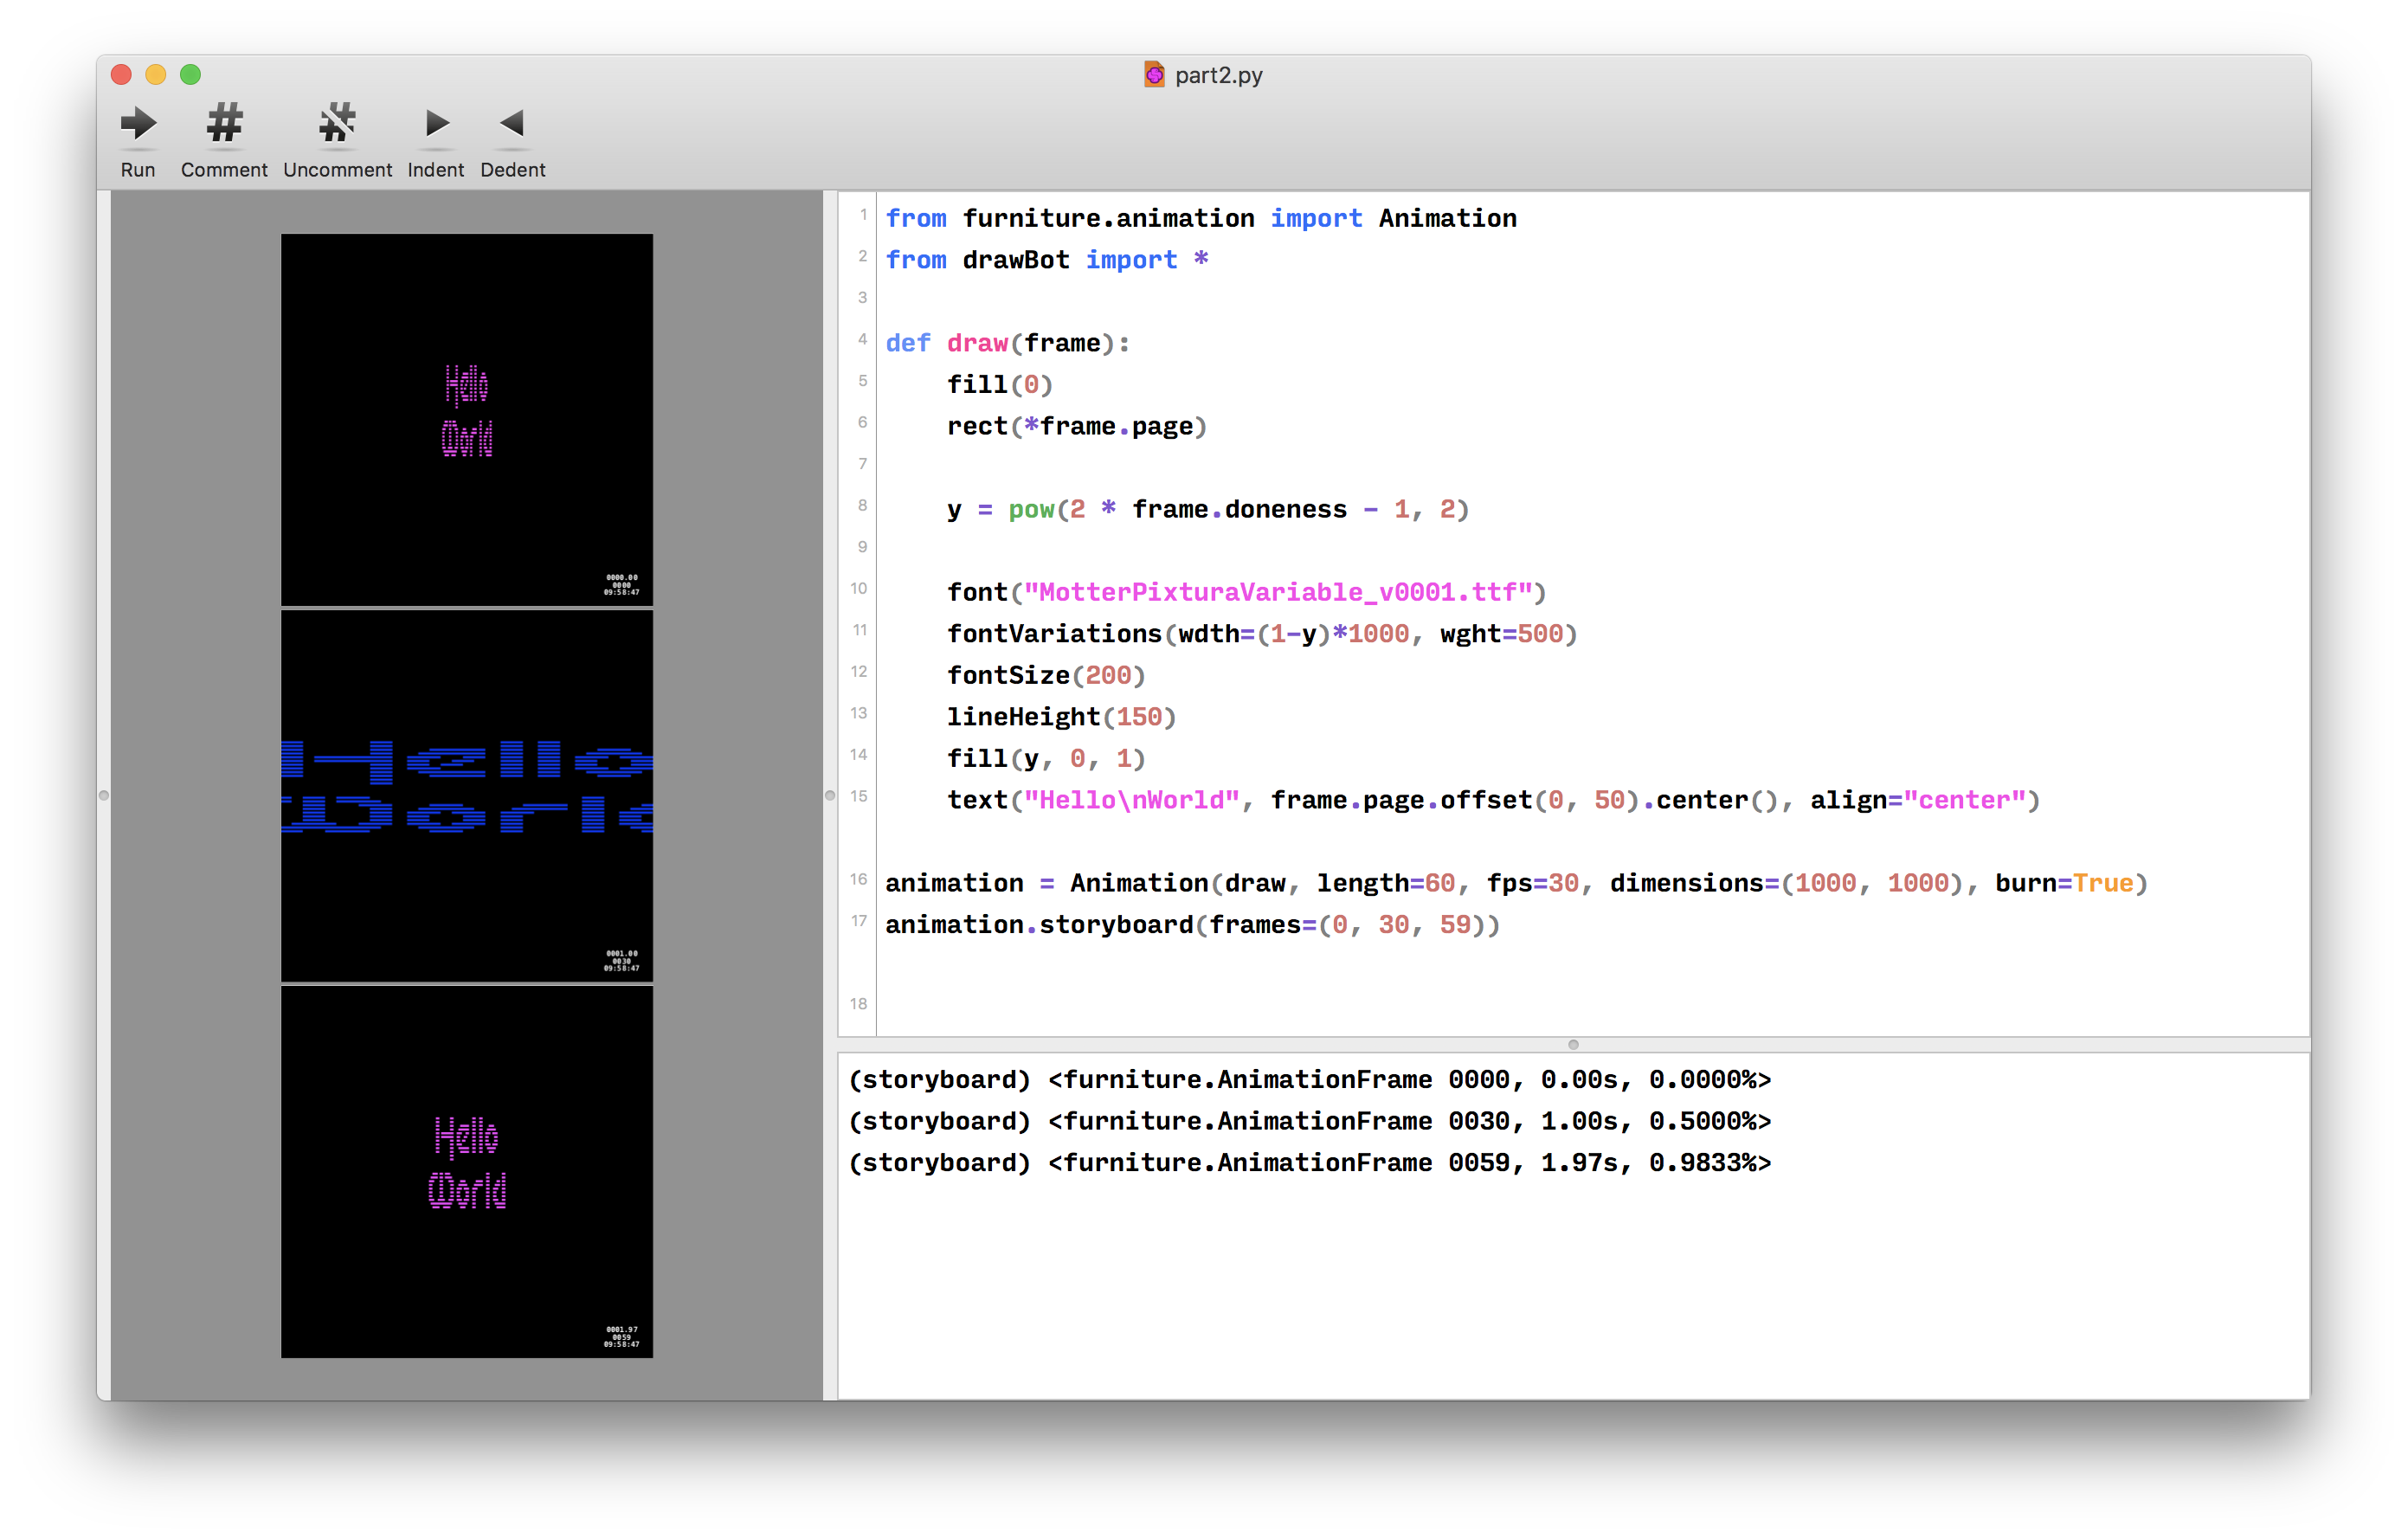
All you need here font-wise is a variable font that has both a wdth and a wght axis (a.k.a “width” and “weight”). You can use whatever font you’d like here — I’m using a pixelated version of the classic Motter Tektura, which I saw used in the 1985 video game “Paradroid” on Fonts in Use, and then I turned into a truly busted variable font that I use for testing purposes. Feel free to take it for a spin — there’s a ttf of it in the github repo, here.
Some other wdth/wght options:
- Ohno Type Co.’s incredible & incredibly elastic Obviously Variable
- The open source variable-type-testing face Mutator Sans
- The free Barlow
Or you can search around on the excellent v-fonts.com; just make sure to Cmd+F for Weight or Width. Of course, there’s no reason to use only those two axes, or two axes at all; anything is fair game for animation, like the incredible DIST (a.k.a. “distortion”) axis in Katja Schimmel’s Tweak Display, or even discontinuous axes like the “Italic” in DJR’s Roslindale Variable Italic — sometimes a “pop” in an animation is a beautiful thing, since it can give your animation a late 50’s/early 60’s vibe ala Maurice Binder’s Dr. No opening credits. (More on this in step 5.)
Once you’ve got that all typed in, hit Cmd+S & Cmd+R.
Really, this is quite similar to the previous animation, except that now it’s some text that widens out and narrows back up again. Good enough for now!
Once you’ve made sure to save the file in DrawBot, it’s time to render on the command-line:
> python3 -c 'import part2; part2.animation.render()`
Step 4. Setting up After Effects
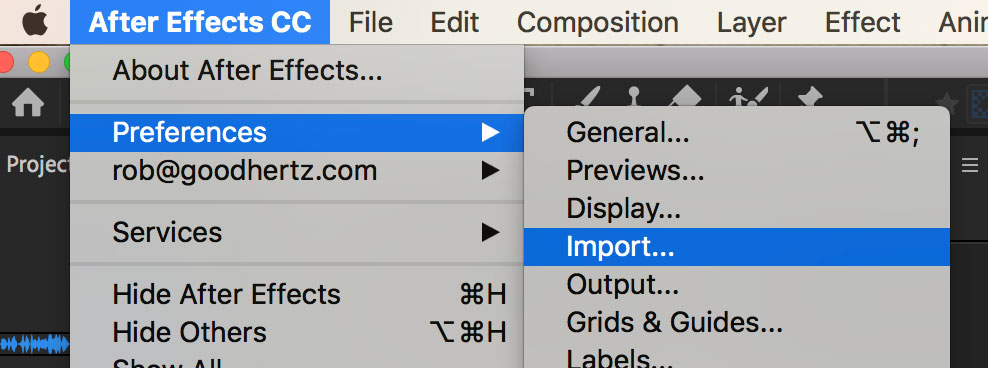
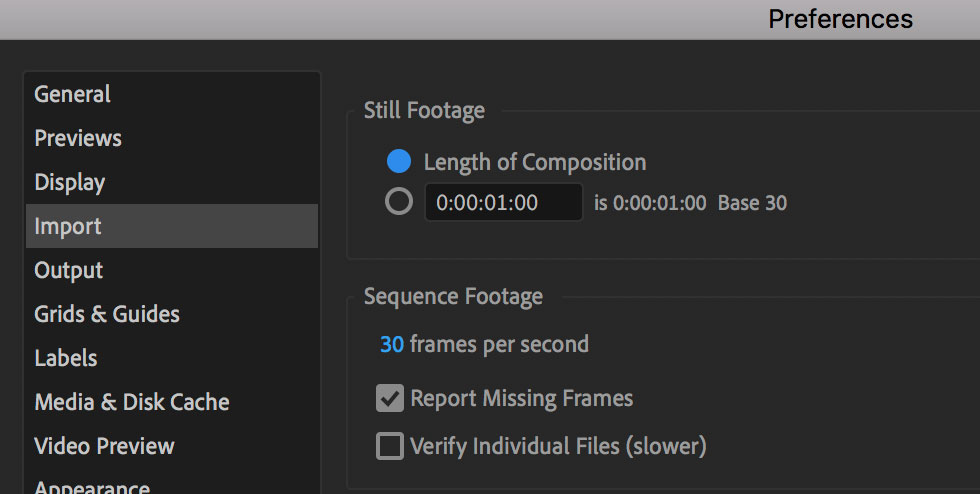
Open up After Effects and start a new composition, then head to the Import section of the After Effects preferences (as pictured below), where you can set the “Sequence Footage” default frames per second to 30. This is non-essential, but will save time later.
Now you can import the PDF sequence we’ve been rendering into the frames folder into the After Effects project, either by right-clicking in the project pane and selecting Import > File (not Multiple Files), or my selecting File > Import > File from the main menu dropdown. (Or you can hit ⌘i. (Or you can double-click the project pane to bring up the import menu.)) When importing, select just the first frame 0.pdf, and make sure to keep the Illustrator/PDF/EPS sequence box checked, as that’s our goal (to create a sequence of PDFs).

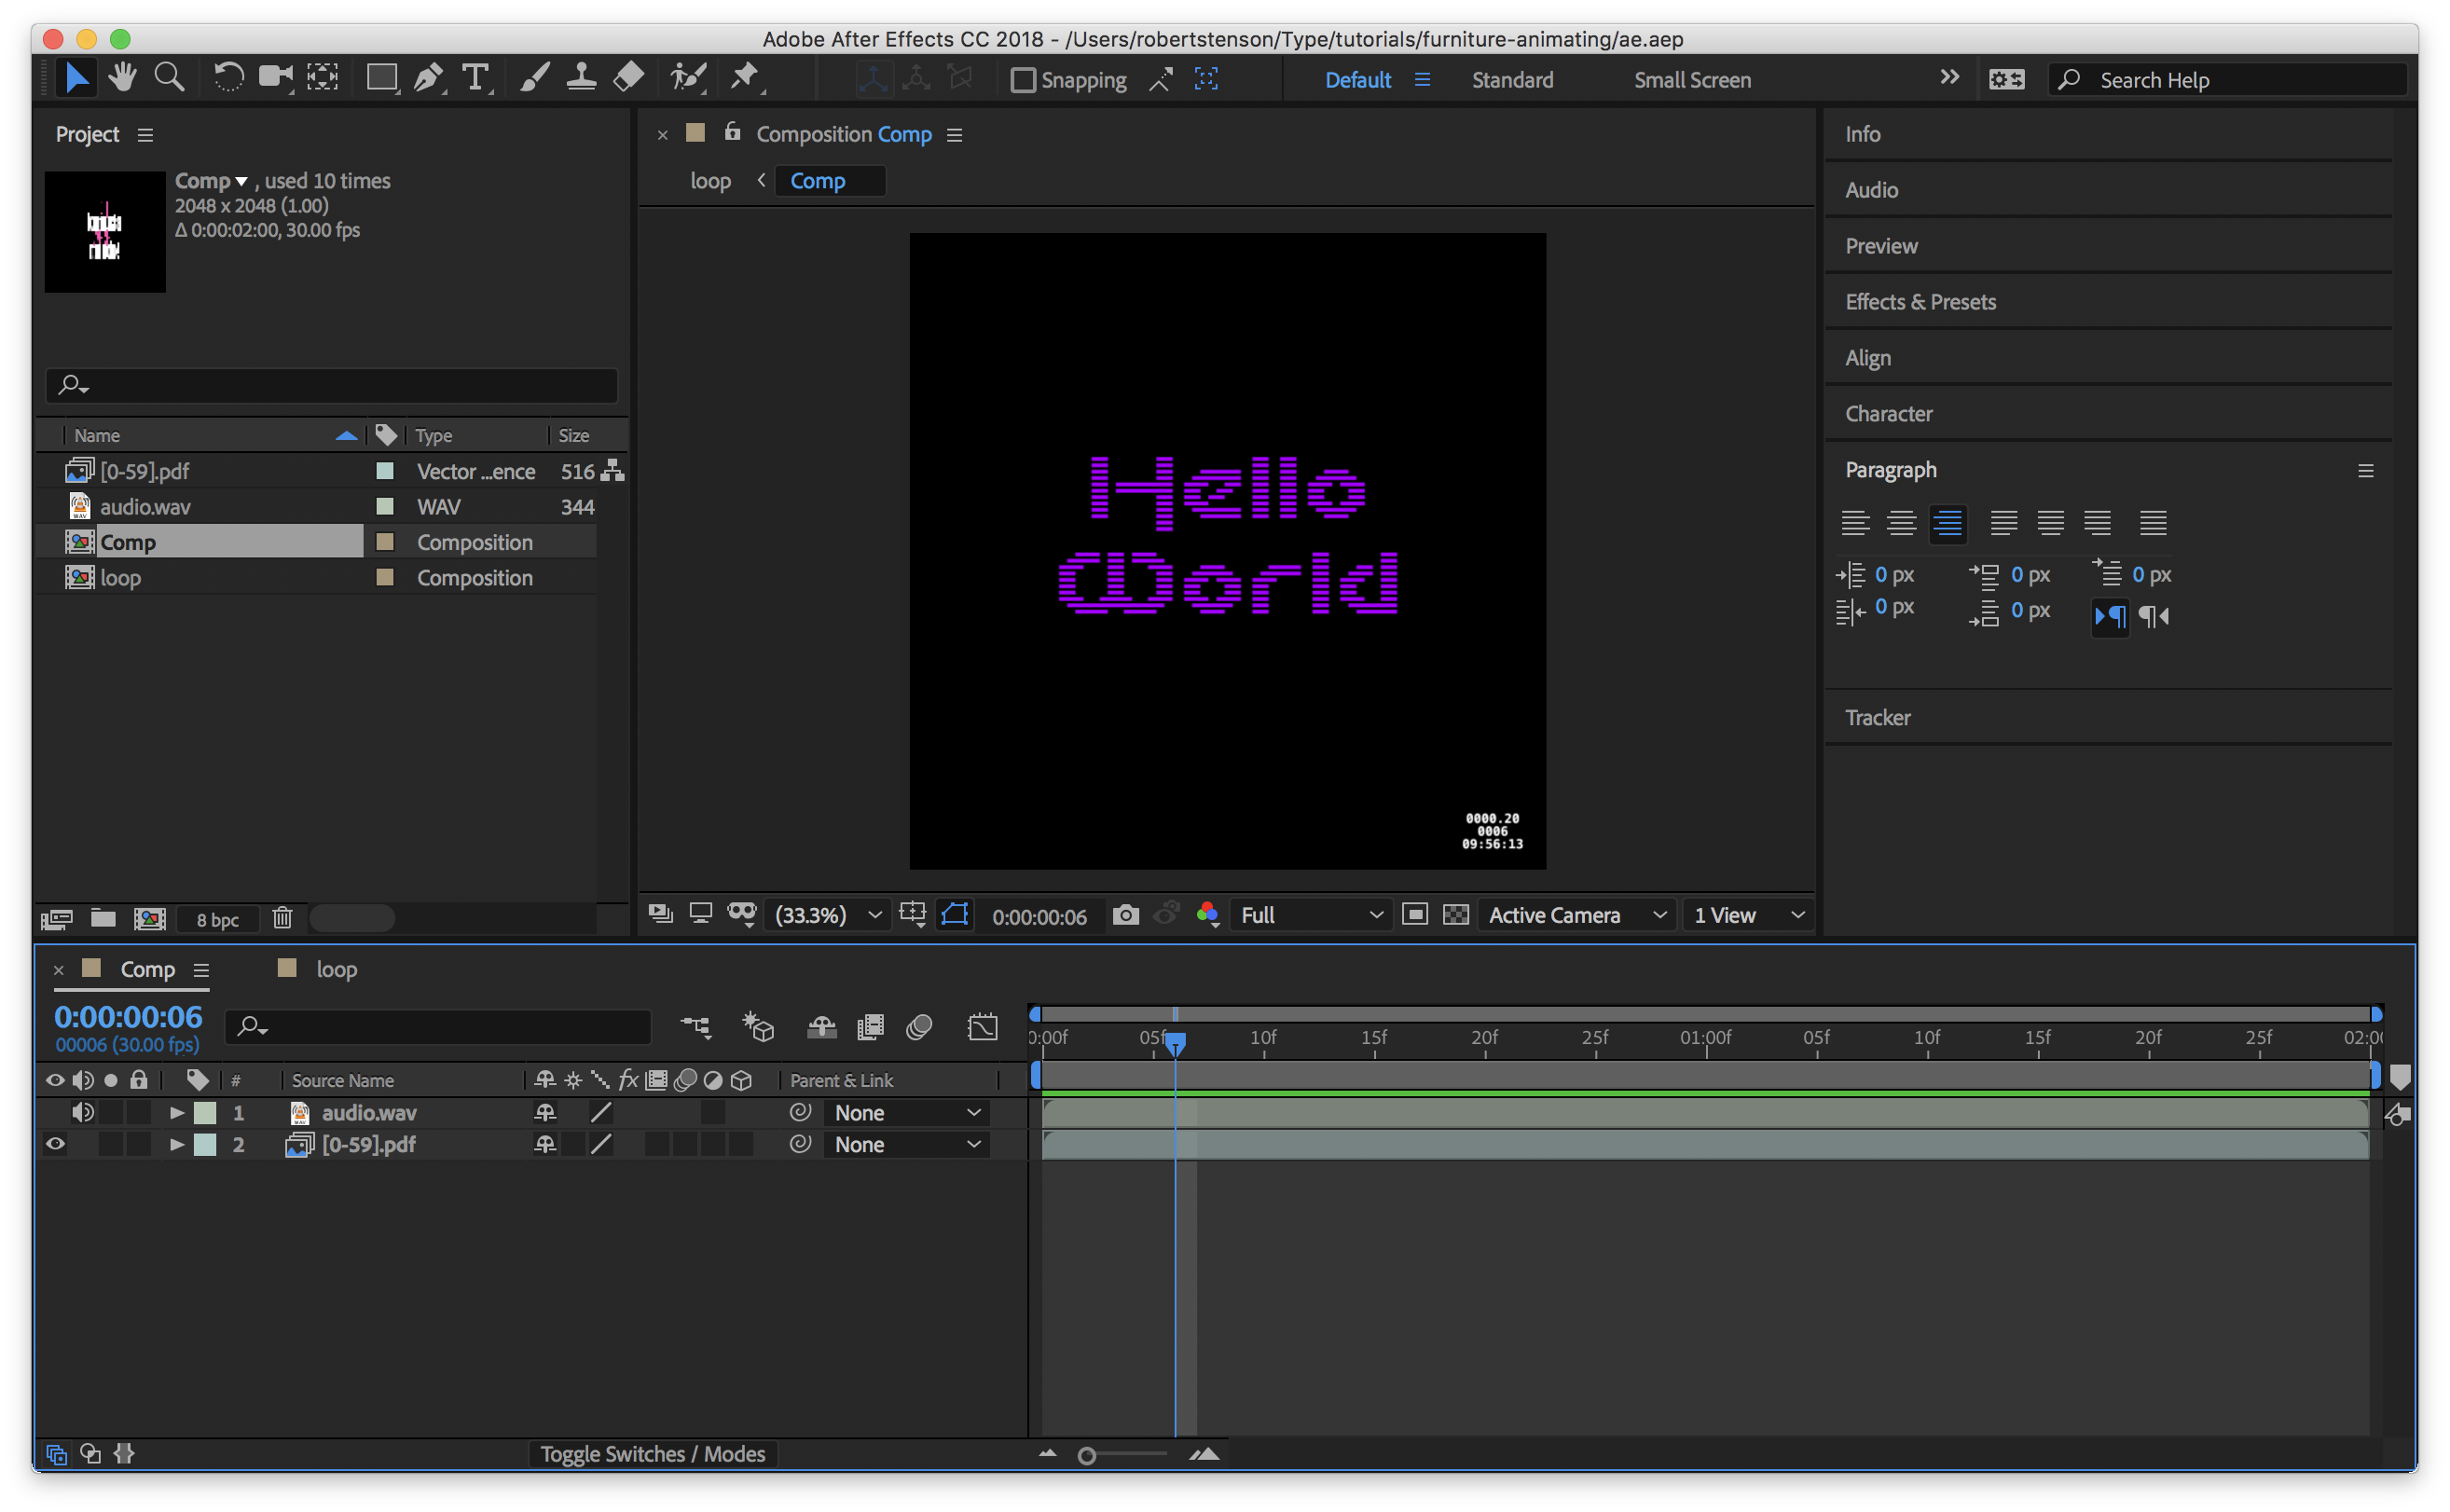
Now you’ve got a sequence in the project, and After Effects probably automatically created a composition for you.
And now we can view it! (If you’re new to After Effects, click into the timeline area and hit the spacebar to trigger playback. It may not be smooth at first, as After Effects is caching the frames internally, but after a single play-through, it should get smoother.)
Also we can add audio to it. There’s an audio file — called audio.wav — in the github repo for this tutorial. This file’s exactly the right length (because it’s one measure at 120 BPM, i.e. the exact same length as 60 frames at 30 frames-per-second). So grab the file called audio.wav and add it to your furnituretest folder then drag it directly to the After Effects composition. Now you have audio!
Step 5. Animating OpenType
It’s worth noting that, though this has nothing to do with the furniture module, one of the huge advantages of doing typographic animations in DrawBot and not in After Effects is that DrawBot has a full implementation of OpenType and variable fonts, so you can do things like animate the font via fontVariations (as above) or toggle OpenType features and stylistic sets in time to music (as below) via openTypeFeatures5.
There’s a lot of new code here, but it’s mostly abstraction in order to make rendering multiple pieces of text easier. One big change: there’s a new function called draw_text defined in the main draw function. This might seem a little weird, but defining a function in another function is an easy way to re-use code without the overhead of abstracting that code into a silo’d function that can live anywhere; i.e. because it’s a function-in-a-function (a.k.a a “closure”), this reusable bit of code has access to all the variables of the outer function, like the frame object.
In a new file called part3.py, enter in this code:
from furniture.animation import Animation
from furniture.vfont import scale_to_axis
from drawBot import *

def draw(frame):
    font("MotterPixturaVariable_v0001.ttf")
    axes = listFontVariations()
    wdth = axes.get("wdth")
    wght = axes.get("wght")
    fontSize(200)
    lineHeight(200)
    y = pow(2 * frame.doneness - 1, 2)

    # building up a dictionary of
    # open-type features
    fea = dict()
    if frame.i > 15:
        fea["ss03"] = True
    if frame.i > 30:
        fea["dlig"] = True
        fea["ss02"] = True
    if frame.i > 41:
        fea["ss01"] = True
    # set the features with the
    # built-up dictionary
    openTypeFeatures(**fea)

    # function-in-a-function
    # (as mentioned in the tutorial)
    def draw_text(t1, t2):
        fontVariations(
            wght=scale_to_axis(wght, 1-y),
            wdth=scale_to_axis(wdth, y))
        fill(y, 0.3, 0.7, 1)
        text(t1, (500, 550), align="center")

        fontVariations(
            wght=scale_to_axis(wght, y),
            wdth=scale_to_axis(wdth, 1-y))
        fill(0, 0.5+y/2, 0.5-y, 1)
        text(t2, (500, 550), align="center")

    fill(0)
    rect(*frame.page)
    with savedState():
        scale(6, center=frame.page.center())
        draw_text(
            "FURNITURE.\nANIMATION",
            "PYTHON\nCODE")
    draw_text(
        "HELLO\n{:02d} FRAMES".format(frame.i),
        "animating\nwith drawbot")

animation = Animation(draw, 60, 30, (1000, 1000))
animation.storyboard(frames=(0, 30, 59))
Now you’ve got the code that powers the video at the top of the article!6
You can head to the terminal and run the rendering command below, which should render the whole animation.
> python3 -c "import part3; part3.animation.render()"
But even if you do that, you’ll notice, back in After Effects, that nothing seems to have happened — that is, it’s still showing the previously-rendered pdfs from last time. That leads us to...
An aside: purging memory
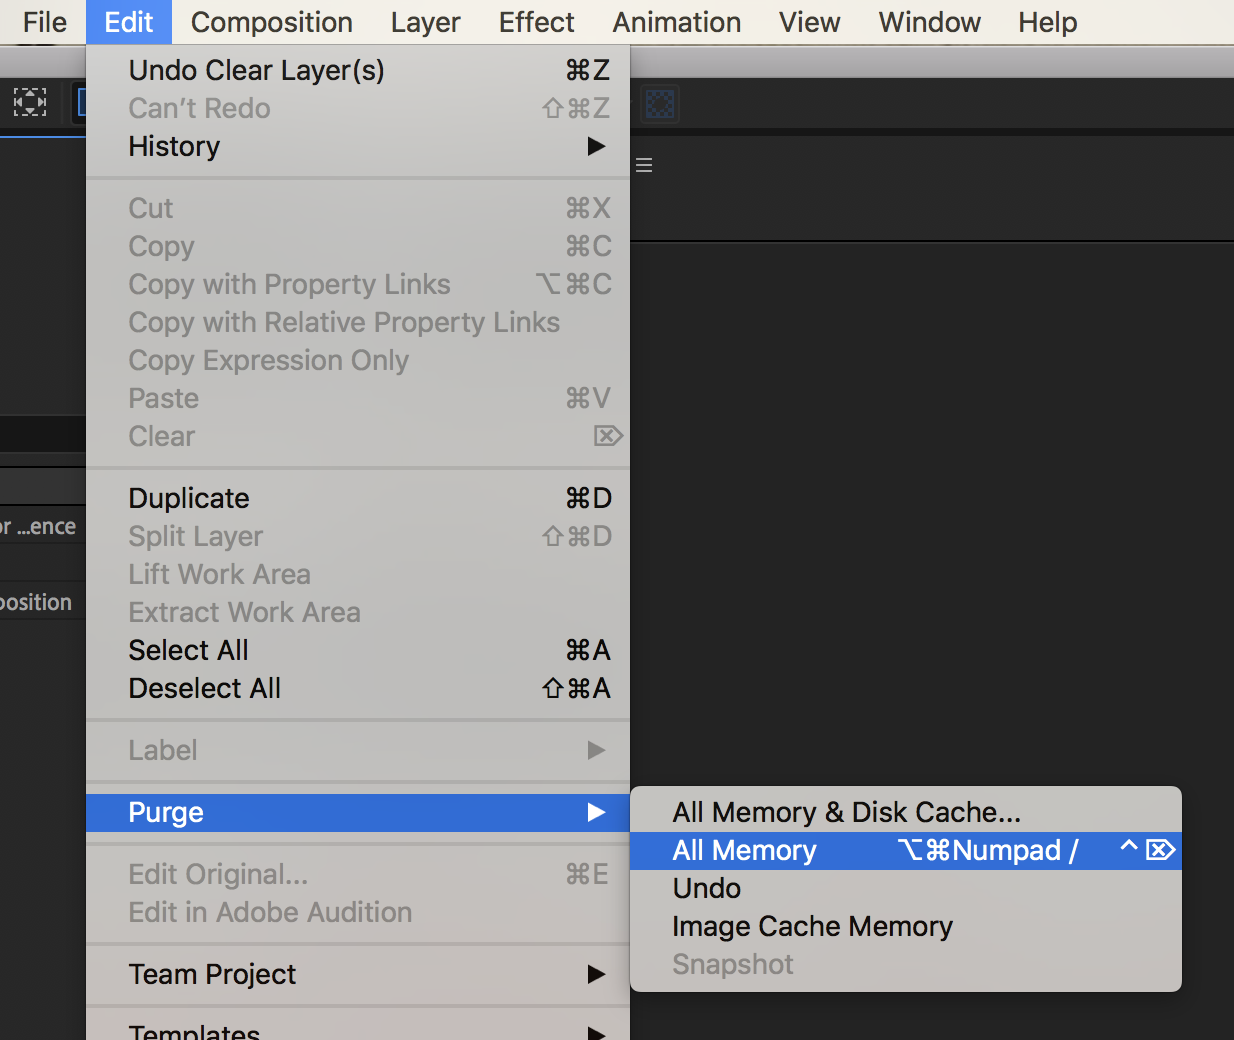
Programmers love to cache things so as to make their apps appear faster. Unfortunately, it is often difficult to tell a computer program to stop caching and update to the latest content. But After Effects does make that possible! If you go to Edit > Purge > All Memory (aka the very look-at-the-keyboard keyboard shortcut alt+cmd+numpad_slash)), this will trigger a refresh and should immediately show your new frames in the playback monitor. (You may need to disable Disk Cache in the Media & Disk Cache preferences.)
Another way around this is to tell After Effects to purge memory via ExtendScript, Adobe’s insular dialect of Javascript. Because I do this regularly, I’ve attempted to make it a part of the furniture.animation library itself, so if you add the purgeAfterEffects=True argument to the render call like this —
> python3 -c "import part3; part3.animation.render(purgeAfterEffects=True)"
— it should switch to After Effects and purge its memory, saving you a lot of keystrokes every time you want to update the viewable animation in After Effects.
If you’re previewing animations in Premiere, hitting the return seems to do a good job of clearing the media cache, though sometimes it won’t clear all the frames, just some of them.
Another aside: No FormattedStrings?
If you’ve used DrawBot extensively, you’ve probably come to love the FormattedString object. I love them, too. So why am I not using them in the above example? To be totally honest, as I built up this animation code from the simplest possible starting point, I think I kind of spaced on it, since I was using the direct text primitive. But I also find FormattedStrings to be less useful when you’re drawing text in a similar but not exactly the same way a number of times. The FormattedString is a way to encapsulate a set of parameters about how text should look, which is why it’s great. It has it’s own internal state representation of typesetting. But because you can’t “erase” the text part of a FormattedString, they’re often difficult to re-use without bending over backward to accomodate lots of copying or vending FormattedStrings from another function. A closure — that draw_text function-in-a-function in part3.py — can offer the same benefits of a FormattedString (encapsulation), but with more extensibility. (Of course, you could always use a FormattedString inside a closure to get the best of both worlds.) This is starting to sound a little ascetic, but if you want to talk more about it, let me know!
Caveats of furniture.animation
Because the animation demonstrated here is so short, all of this may seem like a lot of work for only a little reward. But the rewards of writing animations in this style are huge when you’re writing long or otherwise intensive animations, because this style of code means you can render any frame at any time. Just need to re-render frames 300 to 350? animation.render(start=300, end=350)
But there is one big trade-off when you switch to this callback-based pattern. Often when you begin writing animations, you’re thinking in terms of a loop that goes from 0 to the end of your animation. And perhaps at each render you’re incrementing a value, in order to increase the size of a font or something like that. That’s impossible in this method of animation, because the frames can be rendered out of order, meaning the rendering of a given frame cannot depend on a calculation made in some other frame render. All animation must be derived from the frame object, which provides frame.i and frame.doneness. In the example here, the calculation y = pow(2 * frame.doneness - 1, 2) is a simple quadratic curve that smoothly moves from 1 at frame 0 to 0 at frame 30 (i.e. the half-way point), back to 1 at frame 59. (Or something close to that — I’m terrible at math!)
Conclusion
Let me know if you have any questions about this very long and probably confusing tutorial. Email me at rob.stenson@gmail.com or find me on Twitter at @robstenson.
I also want to send a huge thank you to the makers of DrawBot and all of the various typographically-minded Python libraries that make work like this possible!
And just for fun, here’s an alternate version of part3.py using Obviously Variable’s wdth, wght and stylistic sets:
Impressum
The text of this article is set in Tweak Text and the headlines are set in Tweak Display, two awesome Future Fonts by Katja Schimmel. The code is set in Covik Sans Mono, by Ohno.
Also thanks to Diana, James & DJR for their feedback on drafts of this article!
-
I should point out that these are not things wrong with DrawBot, since DrawBot is meant to be a teaching tool and not be part of an industrial animation rendering pipeling. ↩
-
That said, I think it is possible to do a PDF-to-mp4 pipeline with ImageMagick + ffmpeg, you’d just need to do an intermediate step of creating png versions of each pdf, as demonstrated here. ↩
-
You can do all of these things in a
virtualenv, if you’re into that kind of thing. The only difference is that, in the DrawBot app itself, you’ll need to manually overwrite DrawBot’s module resolution code with a bit of misdirection; add this to the beginning of your code (assuming you’ve created anenvin the same directory as your python animation file):import sys; sys.path.insert(0, "env/lib/python3.6/site-packages")(and you may need to restart DrawBot in order to clear it’s module cache). ↩ -
If you run the code and get an error about
furniturenot being found, your Python might not be 3.6 or might not be installing libs into the spot where DrawBot is hoping to find them. For instance, if you’re using Python 3.7, you can try fiddling with thesys.pathlike so:import sys; sys.path.append('/usr/local/lib/python3.7/site-packages')and it should fix thefurnitureinstallation issue within DrawBot itself. ↩ -
This is another reason to use the “Motter Pixtura” font included in the git repo; inspired by the name “Tektura” (I think that’s a play on technology & textura?), I added a bunch of historically-minded stylistic sets and features, mostly for testing purposes. ↩
-
Well, that’s not quite true. The video at the top is a 4k render, but — bonus! — because we rendered PDFs, you don’t need to render from DrawBot at 2048x2048 in order to get a 4k output in After Effects. You can just scale up your After Effects composition (
⌘k) to2048for both width & height, then back in the composition, select the PDF sequence and ⌘+alt+f to fit the object to the composition. Now you’ve got a 4k-compatible square video, which you can File > Edit > Add to Adobe Media Encoder Queue in order to export an h264 mp4. And probably you should loop it a few times so you don’t need to rely too heavily on the looping mechanism of wherever you’re uploading the video to, so⌘kagain and lengthen the composition duration to a multiple of its current value. Then go back to the composition and enable time remapping (right-click the layer > Time > Enable Time Remapping), then alt-click on the stopwatch that appears, and enterloopOut(type="cycle",numKeyFrames=0)as the expression. Now you’ve got the exact video at the top of this post. ↩